
Diaper Size Guide
First, I’ll show you how to measure the three sizes and below you can then find an explanation for why we chose these measurements specifically.
| Hip Circumference | Without clothes, use a measuring tape to find the widest circumference you can find between your legs and your waistline. The waistline is where you can measure the smallest circumference between your hips and chest. It’s close to your belly button. |
| Waist-Crotch-Waist Distance | With just underwear and a measuring tape, start on your belly at the height of your waistline and then continue downwards through your legs and then back up again behind your back until you reach your waistline. You can also use this to see how high a particular diaper from our shop would go on your body. |
| Hips-Crotch-Hips Distance | With just underwear and a measuring tape, start on your belly at your hipline, where you got your hips circumference from, and measure downwards, through your legs and back up again behind your back until you reach your hipline again. That’s it. |
And now onto the explanation:
On pretty much any other shop, you will find exactly one size range like 75cm-110cm with no explanation whatsoever.
The same with clothing sizes, you probably know very well that such a single range will not give you any idea on whether something will fit you. So that’s why here’s our way of size recommendations for diapers.

If you don’t know how to do a diaper change, I’d recommend to take a look at our Diaper Change Guide first since the following will make much more sense then.
The first thing we need to make sure of is that the back wing of the diaper actually reaches around enough to be able to put the tapes on the front wing. And from the other direction, we need to ensure that the tapes don’t overlap at the front. This is usually what diaper manufacturers and other shops try to express with this 75cm-110cm range.
While measuring out a lot of diapers I’ve noticed that these numbers don’t really match up that well, so here’s how we calculate the Min-Max Hips Circumference that you can find on every diaper product page on ABDL’sWish.
The Min Hip Circumference you need to be able to put on your diaper comfortably will be the scenario where you can tape up your diaper at the front so that the tapes barely touch each other. If your hips are any smaller than that, you’ll have trouble with where to put your tapes, although it’s still possible of course.
So in essence, we take the Back Wing Width (Stretched) and add two times the Tape Length. If that’s your hip circumference, the tapes will barely touch.
So now the opposite scenario: You can’t reach the front wing with the tapes. To avoid that, you’d at the very least need a hip circumference equal or smaller than both the front and back wing widths combined. To make sure there’s some leeway, will take Front Wing Width (Relaxed) and Back Wing Width (Relaxed) instead of stretched. Now you can definitely put the tapes on the front wing.
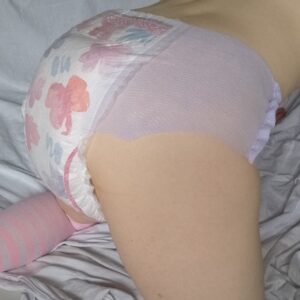
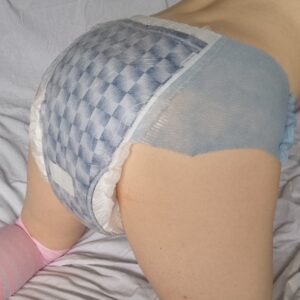
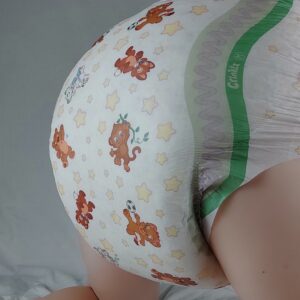
Now to even further illustrate how inadequate just a range of hip circumference is, here’s our ABDL model (me) wearing all 4 sizes of the Crinklz Diaper Standard.


As you can see, I can put on all diaper sizes without too many issues. Just the issue with where to put the tapes comes up with size 3 onwards. For reference: My hip circumference is 87cm, waist-crotch-waist distance is 70cm and hip-crotch-hip distance is 32cm.
And I can also assure you that no matter what size I put on, I won’t have any issues with leaks. However, size 2 clearly fits me best. So here’s the other two measurements so that you can buy the right size from the start:
The Min Waist-Crotch-Waist Distance measurement is illustrated by the following scenario: If the highest tapes of your diaper are way above your waistline, since the waistline is the smallest part and up or down is bigger, the highest set of tapes will gradually slide down to the beginning of your waistline. That’s undesired, so the highest tapes on your diaper should touch the waistline still or they will slide down.
To calculate that, we take the Diaper Length (Stretched) and subtract two times the Tape Distance To Back Wing End and the Tape Width. This will now measure the distance of your diaper from the underside of the highest set of tapes to the back wing at the same height. That’s the Min Waist-Crotch-Waist Distance you need to avoid the tapes from sliding down.
And from the opposite angle: If the highest tapes on your diaper are below your hipline, they and your entire diaper will slide down as well. Therefore we take the Diaper Length (Relaxed) and subtract two times the Tape Distance To Back Wing End and the Tape Width, just like above. And if that’s your Hip-Crotch-Hip Distance, the highest tapes will definitely be above your hipline.
We chose Diaper Length (Stretched) with the Min Waist-Crotch-Waist Distance and Diaper Length (Relaxed) so there still some leeway in both scenarios, although realize that your diaper will always be stretched a bit (unless you like leaks).
And that’s the idea behind our size recommendations. They should allow you to get a very good understanding of which diaper size would fit you. In my case size 1-3 would fit me without any issues, but the most balanced one will be size 2. Knowing that allows me to use size 1 or 3 for special occasions such as when putting on multiple diapers at once.
And if you’re interested in buying a diaper size that’s out of your range according to the recommended size table, you can use the detailed measurements on every diaper product page to see for yourself if it’ll work or not. You can also use those to increase your confidence!
Pull-up Size Guide
Find out whether a pull-up will fit is quite simple, so here’s how to take the three measurements. Below that I’ll shortly explain the reasoning behind them.
| Hip Circumference | Without clothes, use a measuring tape to find the widest circumference you can find between your legs and your waistline. The waistline is where you can measure the smallest circumference between your hips and chest. It’s close to your belly button. |
| Leg Circumference | With just underwear, put your measuring tape around your thigh and slide it up until you hit your crotch on the inside. Take the circumference right there. |
| Hips-Crotch-Hips Distance | With just underwear and a measuring tape, start on your belly at your hipline, where you got your hips circumference from, and measure downwards, through your legs and back up again behind your back until you reach your hipline again. That’s it. |
Unlike with diapers where there’s many adjustment options, pull-ups come like underwear and are ready to be pulled up.
That’s why the Min-Max Hip Circumference and Min-Max Leg Circumference measurements are simple to explain.
Here‘s some pull-ups for reference.
The Min Hip Circumference is simply the Waistband Circumference (Relaxed) and Max Hip Circumference is Waistband Circumference (Stretched).
The same holds for Min-Max Leg Circumference being Leg Opening Circumference (Relaxed-Stretched).
Only the Hips-Crotch-Distance requires some explanation. The scenario where you’re almost too big to wear a pull-up comfortably and without it sliding down is when the waistband is centered on your hipline. Half of the waistband is pulling down, half is keeping it up. So for the calculation we take the Folded Pull-up Length and subtract half the Waistband Height and then double the result to get the length of front and backside together. If your Hips-Crotch-Hips Distance is more than that the waistband will be mostly below your hipline and might slide down.
Now of course you can pull the waistband higher than the pull-up core to work against that, so if you’re close to the size recommendations, I’d recommend to try it out anyway since there aren’t really any real pull-ups being produced for adults and mistakenly missing out on the fun would be sad!
Pacifier Size Guide
This size guide is for those that wonder which pacifier size to pick. First up, the good news: You can use any pacifier size from newborn to adult. They all deliver a different experience so I recommend to buy several sizes at once so that you can see for yourself.
Here‘s some pacifiers for reference.
The bigger a pacifier is, the more it’ll fill your mouth obviously which will make you more and more sound like a babbling baby the bigger they get. A bigger pacifier will also allow you to get a similar experience as babies have since the mouth size / pacifier size ratio is more similar. But again, I’d recommend to try it out for yourself.
Some adult pacifiers might be too big for some big babies though which will put pressure on the teeth and might cause some weird sensation after longer use.
To combat that, you can make use of the detailed measurements we provide for all of our pacifiers such as the Teat Head Width. Using a latex pacifier will also work in your favor since the material is much softer than silicone so it’ll give way to your teeth much easier.
You probably won’t find any other shop with such detailed pacifier measurements, so you might want to consider looking through our pacifiers and buy one, you know? (No, I don’t have any ulterior motives…)
Here’s some products if you suddenly have the urge to fulfill yourself a wish:
-
 Crinklz Diapers Pirates (15 per package)24,99 € – 26,99 €
Value added tax is not collected, as small businesses according to §19 (1) UStG.
plus Shipping Costs
Delivery time: 1-5 Workdays
-
 Crinklz Diapers Fairy Pink (15 per package)24,99 € – 26,99 €
Value added tax is not collected, as small businesses according to §19 (1) UStG.
plus Shipping Costs
Delivery time: 1-5 Workdays
-
 NUK Pacifier Latex (1 per package)7,99 €
Value added tax is not collected, as small businesses according to §19 (1) UStG.
plus Shipping Costs
Delivery time: 1-5 Workdays
-
 iD Comfy Pull-ups (14 per package)11,99 €
Value added tax is not collected, as small businesses according to §19 (1) UStG.
plus Shipping Costs
Delivery time: 1-5 Workdays
-
 DryNites Pull-ups Girls (9 per package)10,99 €
Value added tax is not collected, as small businesses according to §19 (1) UStG.
plus Shipping Costs
Delivery time: 1-5 Workdays
-
 DryNites Pull-ups Boys (9 per package)10,99 €
Value added tax is not collected, as small businesses according to §19 (1) UStG.
plus Shipping Costs
Delivery time: 1-5 Workdays
-
 Crinklz Diapers Standard (15 per package)23,99 € – 29,99 €
Value added tax is not collected, as small businesses according to §19 (1) UStG.
plus Shipping Costs
Delivery time: 1-5 Workdays
-
 Crinklz Diapers Astronaut (15 per package)24,99 € – 26,99 €
Value added tax is not collected, as small businesses according to §19 (1) UStG.
plus Shipping Costs
Delivery time: 1-5 Workdays
-
 Crinklz Diapers Aquanaut (15 per package)24,99 € – 26,99 €
Value added tax is not collected, as small businesses according to §19 (1) UStG.
plus Shipping Costs
Delivery time: 1-5 Workdays
-
 BetterDry Diapers (15 per package)19,99 € – 24,99 €
Value added tax is not collected, as small businesses according to §19 (1) UStG.
plus Shipping Costs
Delivery time: 1-5 Workdays